
Auto-run a workflow when devices are connected
And here is a detailed presentation from the Jamf JNUC 2018 regarding the tools provided on this website:
A popular device management scenario is one in which the act of connecting an iOS device to a computer running device management software, will automatically trigger the restoration and formatting of the connected devices without requiring any user-interaction.
Such a scenario is possible using Apple Configurator 2, but requires some initial setup involving the Terminal application, the built-in “cfgutil” command-line utility, and a special set of Automator actions.
IMPORTANT: The attachment mechanism and tools provided here will work with both macOS Sierra, and macOS High Sierra. To use these tools with macOS High Sierra, install the provided attachment tools and actions after removing earlier versions of the Automator actions and command files that are incompatible with macOS High Sierra.
There are three elements of this automated scenario:
- The Automator workflow file comprised of actions for managing the connected devices
- A Shell-script command file that will execute the target Automator workflow file
- An active Terminal session running Apple Configurator’s cfgutil utility’s “exec” command that will run an instance of the Shell-script command for each attached iOS device
Here is how these elements are implemented to create an automated setup solution triggered when a device is connected to the host computer:
- (⬇ see below ) In a new window in the Terminal application, the “exec” command 1 is entered and run. The execution of the “exec” command begins a new active session process 2 whose log is displayed in the Terminal window. The “exec” command 1 references the path to a shell-script command file 4 that in turn, uses the “automator” command 5 to run a specified workflow 7 that contains the actions for processing the devices.
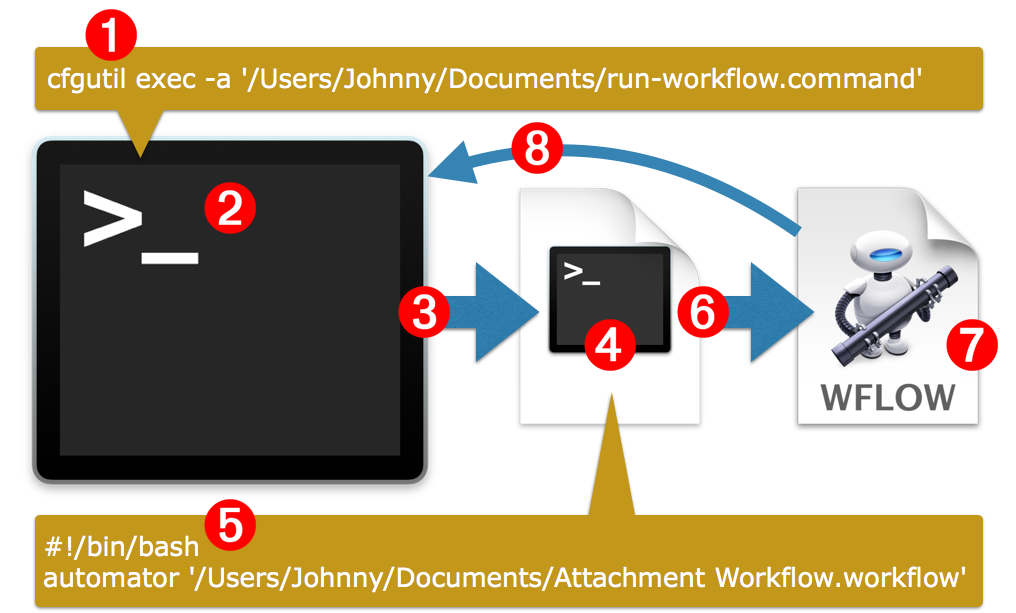
- (⬆ see above ) With the session active, connecting an iOS device to the managing computer, triggers the execution 3 of the shell command file 4 that contains as its code, a shell script 5 that tells the OS to load and run 6 a specified Automator workflow file 7 designed to be used with attached iOS devices.
- (⬆ see above ) The targeted workflow 7 begins and ends with specialized Automator actions that are designed to keep track of iOS devices as they are processed and to return logging data 8 back to the Terminal window 2 displaying the feedback of the initial attachment command.
- NOTE: The Terminal session 2 makes sure that each connected iOS device is “attached” to its own instance of the OS automation runner that executes the targeted Automator workflow. So if 24 devices are connected, 24 instances of the workflow will be created run simultaneously.
- NOTE: This auto-proccessing scenario only works while the Terminal session for the “exec” command is active. When the Terminal session is stopped (the Terminal session window is closed), the attachment triggers cease, and connected devices will no longer be automatically processed.
The “exec” Command
The Apple Configurator 2 built-in command-line utility “cfgutil” provides the “exec” command which will run an instance of a specified shell-script command whenever iOS devices are either attached or detached from the host computer.
The structure of the “exec” command, entered in a new Terminal window, follows a simple structure:
/usr/local/bin/cfgutil exec -a path/to/shell/script.command
The -a option is used to identify the shell command file to execute when a device is attached, and the -d option (not shown here) is used to run a specified shell command file when the device is detached from the computer.
The Shell-Script Command File
The Shell-Script Command File is basically a text file containing multiple lines of UNIX shell code that use the “automator” command to execute a specific workflow file.
The UNIX command file whose contents are shown below, auto-attachment.command, is placed in the Home > Library > Workflows folder when the installer is run.
In the command (line 7), the names and values of UNIX environment variables pertaining to the attached device are passed as input to the Begin Attach Workflow action, which then parses the passed string to retrieve the values, and write them to a property list file used to track the status of the attached device (line 10).
The default environment variables that are automatically set when a device is attached, are: $ECID, $PATH, $UDID, $attachPID, $deviceName, $deviceType, $buildVersion, $firmwareVersion, and $locationID.
| auto-attachment.command | ||
| 01 | #!/bin/bash | |
| 02 | ||
| 03 | # set attachPID to Process ID of THIS thread | |
| 04 | export attachPID=$$ | |
| 05 | # Set Attached Device Directory Value | |
| 06 | workflowPath=$(echo ~/Library/Workflows/attachment-workflow.workflow) | |
| 07 | deviceName=$deviceName&deviceType=$deviceType&buildVersion= $buildVersion&firmwareVersion=$firmwareVersion&locationID= $locationID" "${workflowPath}" | |
| 08 | ||
| 09 | # Check if Cache File exists | |
| 10 | if [ ! -f ~/Library/Caches/com.apple.configurator.AttachedDevices/ $ECID.plist ]; then | |
| 11 | echo "Cache file not found - Automator Workflow completed successfully" | |
| 12 | else | |
| 13 | # Cache file found - Need to check if the PID matches | |
| 14 | echo "Cache File Found - Test PID" | |
| 15 | # Get the PID from the file | |
| 16 | filePID=$(defaults read ~/Library/Caches/com.apple.configurator. AttachedDevices/$ECID.plist attachPID) | |
| 17 | if test $attachPID -eq $filePID | |
| 18 | then | |
| 19 | # The file was created by this PID so the Workflow Failed - Clean up | |
| 20 | echo "PID Match - Workflow has failed - Clean up" | |
| 21 | rm ~/Library/Caches/com.apple.configurator.AttachedDevices/ $ECID.plist | |
| 22 | else | |
| 23 | # Re-Entry - Do Nothing | |
| 24 | echo "Re-Entry - Do Nothing" | |
| 25 | fi | |
| 26 | fi | |
You can compose a shell command file in any text editor such as BBEdit, TextWrangler, TextEdit, etc. and save it as a standard (non-RTF) text file with the “commmand” file extension. Once saved, you convert the text file into a executable command file by entering and running the following in a new Terminal window:
chmod +x path/to/shell/script.command
The Attachment Actions
During the process of being erased or restored, deices will often detach themselves from their host computer and reattach after completing a restoration or erasure.
On a computer running an “exec” attachment session in the Terminal, reattachment by a device will re-trigger the running of a desginated attachment workflow. In order to prevent a workflow from running repeatedly on the same device, use the Attachment Actions provided here, to track the status of devices and protect them from looping workflows.
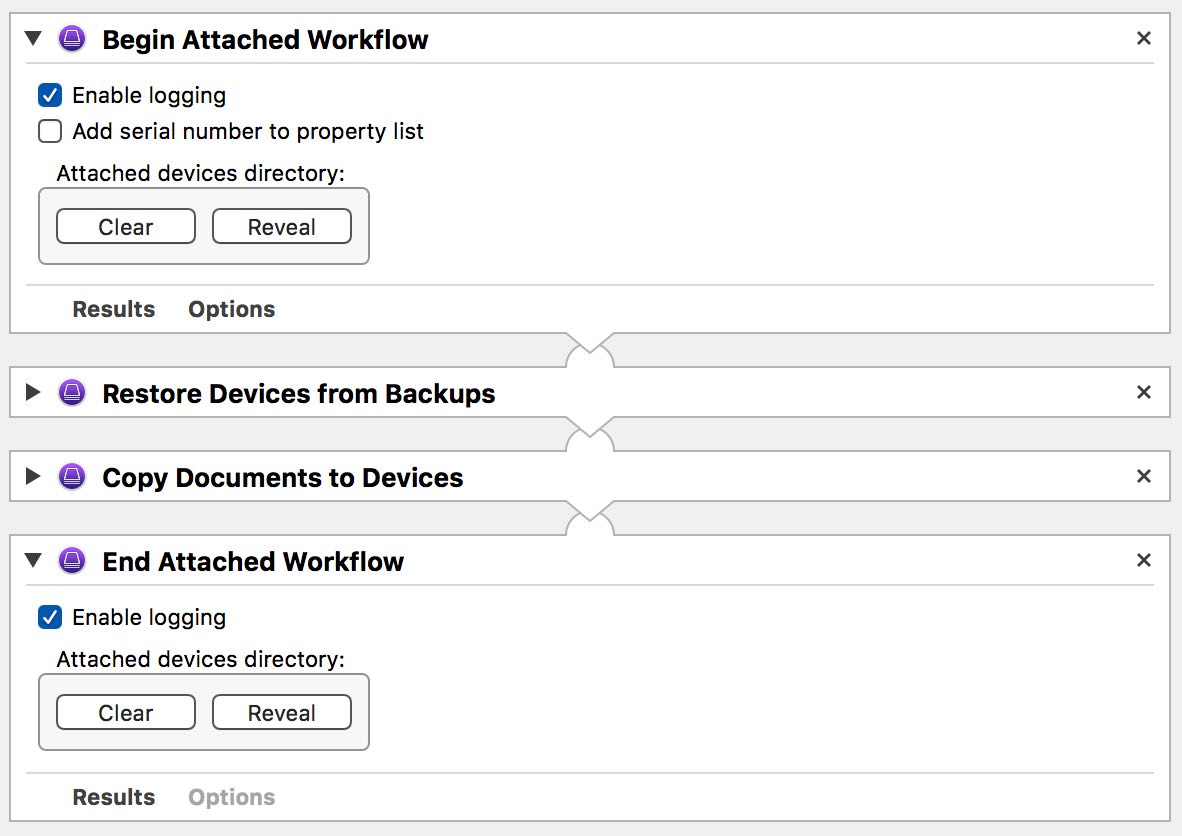
To create a thread-safe workflow, simply begin the workflow with the “Begin Attached Workflow” action, and end the workflow with the “End Attached Workflow” action:
The “Begin Attached Workflow” action (v1.5)
Both of the attachment actions perform their functions by monitoring the contents of the “com.apple.configurator.AttachedDevices” folder located within the user’s Cache folder:
/Users/Johnny/Library/Caches/com.apple.configurator.AttachedDevices
When a workflow beginning with the “Begin Attached Workflow” action is run, the action will first determine the ECID of the device that the workflow is targeting by reading the value of the $ECID environment variable. It then then checks the contents of the “com.apple.configurator.AttachedDevices” folder to see if it contains a property list file whose name matches the ECID of the attached device.
If the folder contains a matching property list file, the “Begin Attached Workflow” will stop the execution of its parent workflow, since it is assumed that the iOS device is still in mid-process and is re-attaching to the host computer thereby re-triggering its related workflow.
However, if there is no matching property list file, then the “Begin Attached Workflow” action will read the values for all of the environment variables and write the retrieved data into a new property file it creates within the “com.apple.configurator.AttachedDevices” folder. This created property list file is named using the ECID of the attached device.
The action view of the “Begin Attached Workflow” action contains three controls: (⬇ see below )
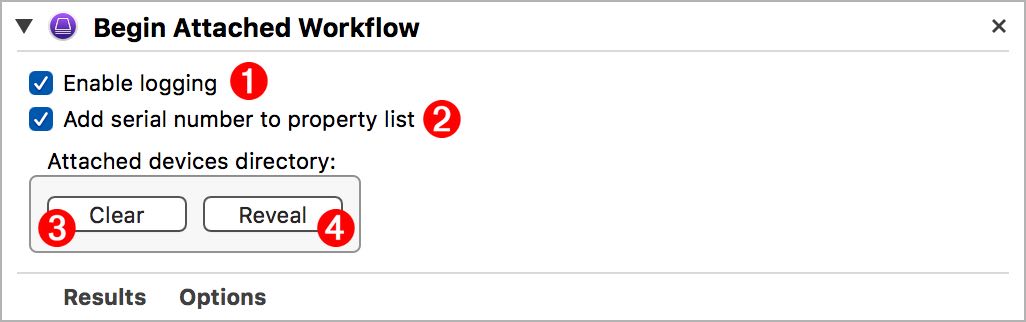
1 Enable Logging • Select this check box to have the action display a on-going log of its processes in the Termnial session window.
2 Add Serial Number • If this option is selected (it is off by default) the serial number of the attached device will be retrieved and added to the property list file in the Caches folder. Workflow variable scripts or script in the Run AppleScript, Run Shell Script, or Run JavaScript actions can then retrieve the serial number for use without having to query the device again. (⬇ see below )
3 Clear • Click this button to delete any existing property list files from the “com.apple.configurator.AttachedDevices” folder.
4 Reveal • Click this button to select and show the “com.apple.configurator.AttachedDevices” folder in the Finder.
The “End Attached Workflow” action
Like the “Begin Attached Workflow” action, the “End Attached Workflow” action monitors the contents of the “com.apple.configurator.AttachedDevices” folder.
Since this action is placed at the end of a device-processing workflow, it is used to indicate that a device has completed processing. Therefore, it deletes the property list named for the ECID its receives as its input.
The action view of the “End Attached Workflow” action contains three controls: (⬇ see below )
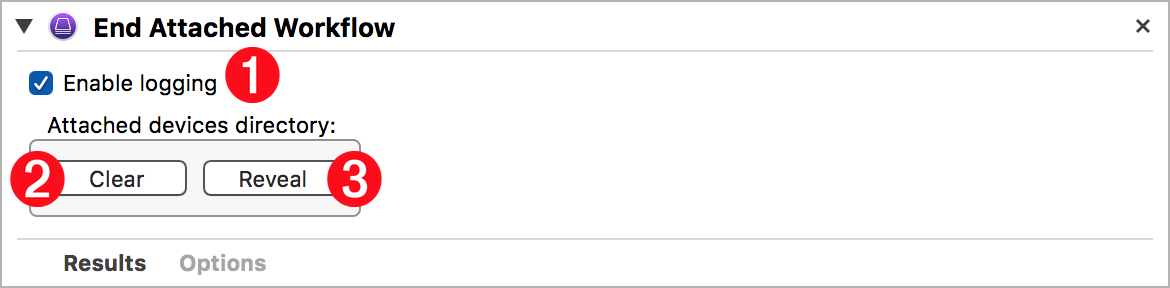
1 Enable Logging • Select this check box to have the action display a on-going log of its processes in the Termnial session window.
2 Clear • Click this button to delete any existing property list files from the “com.apple.configurator.AttachedDevices” folder.
3 Reveal • Click this button to select and show the “com.apple.configurator.AttachedDevices” folder in the Finder.
NOTE: If no property list matching the passed ECID is found in the attached devices folder, this action will log an error message that will appear in the log displayed in the Terminal session window.
The Installer
An archive is provided here for downloading that contains an installer applet for the two attachment actions and their related AppleScript scripts, as well as example command and workflow files.
DO THIS ► DOWNLOAD the installer for the attachment actions and related files, and then follow the these steps:
- Run the Automation Tools Installer applet and provide an administrator password in the forthcoming security dialog. The installer will place the required Automator actions, UNIX command file, and AppleScript script files in their required locations in the user Library folder. In addition, the example “attachment-workflow.workflow” Automator workflow file will be placed in the Workflows folder in the user Library folder.
- IMPORTANT: the “attachment-workflow.workflow” workflow is provided as an example, and is specifically referenced in the “auto-attachment.command” file also installed in the Home > Library > Workflows folder. This workflow will speak the ECID number of the connected device. Use this workflow file as your template for creating the attachment workflow. Replace the Speak Text action with the Apple Configurator actions you want to use to process connected devices. Leave the file named as it is and in the Workflows folder.
- Disconnect all connected iOS devices.
- Launch the Terminal application.
- With the Terminal as the frontmost application, select the “Activate Chosen Attachment Command” menu option from the system-wide Script Menu displaying on the top right of the main menu bar. In the forthcoming chooser dialog, navigate to and select the “auto-attachment.command” file located in the Workflows folder in your home Library folder.
The script will complete by beginning a new Terminal session that will respond when iOS devices are attached to the host computer. - Attach an iOS device to the computer and watch the Terminal window while an individual instance of the workflow executes for each attached device. If logging is enabled in the Automator actions, all of the steps taken by the actions will be logged and displayed in the Terminal session window.
- To disable auto-attachment processing, close the Terminal session window.
Attachment Files
The “auto-attachment.command” and “auto-attachment.plist” files are provided in the Attachment Files folder in the installer folder. You can edit and install the “auto-attachment.plist” file to enable automatic attachment action whenever an iOS device is connected.
Auto-Launch Setup (Optional)
With Apple Configurator 2.2.1, you can now bypass the requirement for manually beginning a Terminal session for the cfgutil exec command, by creating and installing a Launch Services instruction file.
DO THIS ►In the provided Launch Services property list (auto-attachment.plist), change the placeholder to path to the Command File you are using (auto-attachment.command). After making the change, put the property list file in the LaunchAgents folder in the user Library folder. The process will load automatically at next login or can be toggled manually using the launchctl command